I feel there is no such thing as “success” instead it is “personal success”.
Very often people don’t treat “success” as “personal success”. By this I mean they compare their own success to others.
Each person runs their own race of life. He has his own value system.
Success has varied number of factors and whatever impact these factors is going to have on the success of a person is going to be limited to the person in question.
Also different people may have different priorities, factors and timelines that contribute to their success. They may have different goals, choices, appetite and satisfaction levels.
That is why I feel, “success” is actually “personal success”.
When one treats it as “personal success”,
He is aware of the terms and conditions that come with it.
He does not treat the role model, if any, as the sole destination but instead gains knowledge about the big picture of risks and rewards from the experience of the role model.
He is aware of the “what, why, when, where and how” questions about his idea of the quest of success.
When talking about Personal Finance, the devil is in the details !
Personal finance is the financial management which an individual or a family unit performs to budget, save, and spend monetary resources over time, taking into account various financial risks and future life events.
However for each individual, the need, process, goal and the reason for doing money management (as in personal finance) is different.
A lot of times as one grows in their quest of earning money, one often feels the pressure about a particular form of investment, type of budgeting method or way of spending money, etc.
However without understanding one’s true need and goal, it is not good to treat “finance” as something “generic”. It is not “generic”, in fact it is indeed “personal”.
There are a varied number of reasons for which one may have management of his personal finances like :
Opportunity cost
Stability
Volatility
Total cost of ownership
Cashflow
Capital gains
Buying time
Buying efforts
Long term / short term
Etc.
The list may be short / long / endless with respect to the above one, but the main idea here is, it is case by case basis depending on the individual in question.
That is why I feel, if possible one must definitely understand in general about the holistic picture but when it comes to one’s own “personal finance”, it is “personal”.
In this blogpost we will see the basic disassembly of code generated for JVM bytecode from a compiled Kotlin class to understand how boolean data type is treated internally.
A. Goto "Help" --> "Find Action" --> type "Plugins" and open the Plugins Marketplace.

B. Switch to "Installed" tab and in the list of plugins installed, confirm the above decompiler plugin.
Once you show the bytecode, it should look like below :
In above kotlin/java bytecode asm disassembly, the main section is the instructions used in “public final static main()V” i.e. “ICONST_1” and “ISTORE 0” followed by a “RETURN”.
Note that everything after end of L1 section, is just verbose information given as part of the disassembly.
So internally in the JVM, an “int” constant with value “1” (true) is pushed on the operand stack by “ICONST_1” and further stored on the local variables array at index 0 by “ISTORE 0”.
Observation
This tells us that the JVM “int” data type with value 0/1 is used internally for representing false/true value of a boolean, respectively.
For more information on the internal JVM instruction set and its working(Local variables array, Operand stacks, Method references, Constant pool, etc.), the JVM Specification is helpful esp. the Frames section.
Therefore the bytecode generated for above Kotlin source code using Boolean data type(BooleanSize.kt) will be same as the bytecode that will be generated for below Kotlin code snippet using the Int data type :
This behaviour of treating Boolean as int is same since very long which I had covered more than a decade back in the Java source-specific reversing blogpost. In fact, this Kotlin source-specific blogpost is a revisit to the same study of boolean size in JVM because the Kotlin source is targeted to compile into Java bytecode.
The reason for treating a boolean as int, is simply the basic fact that the minimum possible atomic size of addressable data that can be stored or worked upon, in general for computation at processor level itself, is a byte (8 bits) and not a bit (1 bit).
And hence this is the reason a boolean cannot be treated in an optimum way practically as a single bit even if it theoretically represents at the most only two values(false/true) represented by a single bit change (0/1).
Installing jekyll on an outdated Windows 7 OS needs a group of modules(ruby, gem, bundle, jekyll) with a specific matching set of older versions of the dependencies.
On Windows 10 most of the latest versions of the required modules and gems are compliant with the OS.
Hence for Windows 7 x64, the table below highlights the group of modules with versions that are tried and tested and covered by this guide for a successful jekyll installation :
Note#1 : The “architecture” used by “mingw” is “x64-mingw32” since its x64 edition of Windows 7.
Note#2 : While installing Ruby+Devkit please opt to install the complete msys2 suite.
This guide is tested on Windows 7 Ultimate x64 with below details:
Microsoft Windows [Version 6.1.7601]
Copyright (c) 2009 Microsoft Corporation.  All rights reserved.

systeminfo | findstr /B /C:"OS Name" /B /C:"OS Version"
OS Name:                   Microsoft Windows 7 Ultimate
OS Version:                6.1.7601 Service Pack 1 Build 7601
$ bundle -v
Your RubyGems version (3.0.1) has a bug that prevents `required_ruby_version` from working for Bundler. Any scripts that use `gem install bundler` will break as soon as Bundler drops support for your Ruby version. Please upgrade RubyGems to avoid future breakage and silence this warning by running `gem update --system 3.2.3`
Bundler version 2.4.12
Jekyll:
$ jekyll -v
To use retry middleware with Faraday v2.0+, install `faraday-retry` gem
jekyll 2.1.0
This is my first post under the category of Personal finance. In this I wanted to pen down the way I look at money.
What is money ? ( hehe basic question ! )
I personally feel that money is just a very popular misnomer.
It is simply a currency. A medium of exchange. Yet it is often misunderstood as wealth.
And since they primarily look at money as wealth and not as a “side outcome” or “byproduct”, they often have misconceptions of money as being the primary objective.
Money is the figurative representation of the amount of value you add and hence primary objective should be to improve the value you add in earning the money.
This not only makes one appear greedy but it is not sustainable in the long run since being wealthy is about the journey of earning wealth and not only the destination.
In fact one should understand how money is created which will make it easy to understand how it can be seen as a “byproduct”. I will write about this “money printing”, may be some other day since it is not the primary reason of writing this post.
My take is, it can be seen as a vehicle to go from point A to point B rather than as wealth.
Now you may say, “yeah yeah Shubham, definitely it is not wealth and we know that”.
Well my point is not about only the wrong interpretation of money as wealth, but more about the fact that money should not only be seen as a currency but what you do with it is also more important esp. when you ask yourself questions like,
“How happy I am by earning my money ?”
“Am I spending money on the things I like to do ?”
“How am I using my money to invest in myself ?” - Most important if you ask me.
“Am I investing my money ? “ : This one is more tricky. Since if the answer is “Yes” to this question then, you should ask more questions to yourself like,
“Are you investing your money in other people’s investment or your own one ? Like something you want to build yourself personally or be part of or want to contribute to.”
Do you like the way you are earning money ?
The thing about money is there are many ways to earn it and hence how do you feel about the way you are earning it, is more important than how much you earn it. This includes the terms and conditions that come with the way you are earning it.
Each person is unique and hence “find your game” of earning the money. Take it as a sport and hence decide if you like the sport you are playing first i.e. know if you are loving the way you are earning money and happy about it. And like any other sport, this has rules too. Understanding the economy is one way of knowing the rules of this sport. I am learning about it too.
Whats your definition of being wealthy ?
I think the time value of my money is more important in terms of giving me the happiness.
To sum up, I would say that as money is time-driven it is more about how happy you feel while you are on the journey of earning it, since at the end even if you are wealthy the thing that is going to matter to you alone is, “how did you became one” rather than “you became one”.
So my definition of being wealthy would be my happiness in the process/journey of becoming wealthy esp. the mindset.
Keep learning !
Disclaimer : I am not wealthy :-P and this post is to express my mindset about money.
This was the time during which Google Blogger was already old enough and popular as a traditional blogging platform.
So the stats for these 10 years are as follow :
I wrote 16 posts i.e. on average 1.6 articles per year. Wait ! Didnt you read my shameless “Lazy Blogger” self-declaration on the left sidebar ?
Out of total 16 posts, 4 of them are in the process of being recovered from my expired hosting space. Again ! Being lazy here to reconstruct these 4 articles.
Also, 1 article out of total 16 is missing “pictures” due to same incident of my expired hosting space. Guessed ? Now you know the lazy blogger in me.
In these 10 years I have used 3 blog engines. Another blogpost some other day on this soon !
Recently one of my friend was looking to buy a new residential flat in Pune and asked me if there is a checklist.
I immediately replied in the chat to my friend, a “rough” checklist which I am also going to elaborate in this blogpost.
So here is a checklist that I think a flat buyer can use based on my personal journey and experience of buying a flat in Pune :
Note: I feel that until each step in the checklist is not followed strictly, one should not even move to the next step at all.
Finalise budget, BHK type (no. of rooms), and group of localities you like before even you start your flat buying journey. These 3 things should be damn final and you should be firm on them.
For each flat, consider builder’s experience (and not reputation as depicted in media) : Check past delivered projects by asking residents of those delivered projects or confirming the same as a recommendation in your network.
For each site visit, run away from project site if sample flat is furnished one OR the sample flat is at separate location from the building wing where all the residents are going to reside. Dont fall for the trap of visiting the sample flat even if requested multiple times by the builder.
Remember, less amenities = less maintenance preferred. On flat visit, make sure you note flat layout, carpet space, facing, frontage, ventillation and rooms layout. Do not forget to confirm electricity and drainage connections of the project site.
For each of 3 final selected flats, RERA project details with litigations : Easily doable online as a self-lookup.
For final one flat that you selected, paid lawyer due deligence is a must : Property advocate will confirm land litigations, many other certificates and other details.
At agreement time, read carefully line by line the draft soft copy of flat sale agreement and the final agreement.
At possession time, basically check everything in your flat : Kitchen top leakage, all dado works, all tiles grooving and cleaned plumbing system.
This post is recovered from damaged website. Work is in progress for this blogpost and below 3 specific blogposts:
http://shubhamaher.com/jamun-shots-recipe
http://shubhamaher.com/torna-fort-trek
http://shubhamaher.com/boiled-egg-bhurji-recipe
This year, in the monsoon season, knowing that the rainfall is incessant and will last longer than previous year I thought September last week will be the best time for the “annual” Goa trip. Yes!, you read it right “annual” because Goa is something I visit almost every year to unwind.
Coconut trees at Arossim Beach
Add to it the fact that the end of the monsoon season is around the month of September and the start of tourist season is around mid-October (because of Diwali vacations, Christmas, New Year, etc).
So travelling to Goa at the end of the month of September was my best decision to enjoy the less-crowded beaches, awesome greenery-just-after-the-end-of-monsoon season, benefits of less prices before the start of the tourist season: in short to Enjoy the Best of Goa !
Since this was my 7th trip to Goa and in all my previous travels, I have stayed at and visited places of North Goa, this time I decided to stay at South Goa.
Looking for accomodation in the South Goa, I found a very good deal on Goibibo for Treehouse Nova, Cansaulim at just 5195 INR for 3 nights with breakfasts !
Itinerary
Although I have visited Goa in the past, it was the first Goa trip for my wife and so I came up with the below itinerary to consider places of South Goa keeping in mind the places of North and Central Goa as well.
Day Region Places
1 South Goa Mobor beach, Colva beach
2 North Goa Calangute beach, Anjuna beach
3 Central Goa Panjim city, Miramar beach
4 South Goa Arossim beach, Majorda beach, Nanu beach
Beach Hopping !
Mobor Beach (Day 1)
A view at Mobor Beach
One of my favourite lunch : Goan Fish Thali at Betty’s Place near Mobor Beach
Calangute Beach (Day 2)
Relaxing on the Calangute Beach
At Calangute Beach, we just relaxed at a shack gazing at the sea and sipping drinks 😉
Travel Tip#1: Water sports are expensive and limited at Calangute Beach so prefer to do them at less price on Anjuna Beach which is not that far from Calangute Beach.
Anjuna Beach (Day 2)
We did water sports at Anjuna Beach.
Travel Tip#2: Now a days, water sports activities have been commercialised a lot and hence the prices are now increased. However if more than one person is going to do the water sports, be patient and bargain !
I struck a good deal for 2 of us that included a package of 4 sports ( Parasailing, Banana ride, Bumper ride and Jetski ride) for 2200 INR (2people).
Getting ready for Parasailing !
Parasailing
Parasailing at Anjuna Beach
Goan Thali Lunch near Anjuna Beach
Panaji City (Day 3)
In Panaji, we visited the Fontainhas (Latin Quarter), Panaji Church, Viva Panjim and Miramar Beach.
With my wife at Our Lady of the Immaculate Conception Church, Panaji
Lunch at Viva Panjim – A famed restaurant serving delicious Goan and Portuguese cuisine
Arossim Beach (Day 4)
Arossim Beach
A view at Arossim Beach
Boat (white) at Arossim Beach
Arossim Beach view
Boat (cyan) at Arossim Beach
Majorda Beach (Day 4)
Parasailing activity going on at Majorda Beach
Boat at Majorda Beach
Majorda Beach view
Coconut trees at Majorda Beach
Nanu Beach (at Betalbatim) (Day 4)
Nanu Beach view
Nanu Beach at Betalbatim
Trip Costs
I had a good 4 day / 3 night trip in Goa within my budget. I spent 16890 INR in total right from my home in Pune to Goa and back. Below is the breakdown of major expenses :
Sr. No. Expense for Expense Amount
Pune-Goa Bus (Non-AC Seater) for 2 1400 INR
Goa-Pune Bus (Non-AC Seater) for 2 1200 INR
Stay at Treehouse Nova (Superior Room, 3 nights with buffet breakfasts, 2 people) 5195 INR
Water sports at Anjuna Beach for 2 people 2200 INR
Bike Rental (1 Honda Deo at 400INR/day for 4 days) 1600 INR
Bike Petrol (Burned ~10 litres in 4 days) 700 INR
Food(4 lunches, 4 dinners), Cabs (4), etc.
(Note: Lost track of other expenses but all within this
amount only) 4595 INR
Recently I had boiled egg bhurji on a street food joint in my office area after which this became one of my favourite dish.
After observing the street food vendor make it for me many times, I wanted to cook it soon.
I tried cooking the dish and it did turn out successful. Here is the recipe for a simple, quick and lip-smacking boiled-egg bhurji ! Enjoy !
Ingredients
Eggs – 4 ( for 2 servings)
Onions – 2 (big)
Tomatoes – 1 (big)
Green Chillies – 3 to 5 ( as per taste )
Coriander Leaves ( for garnishing )
Salt ( as per taste )
Turmeric Powder ( 1 teaspoon )
Red Chilly Powder ( 3 teaspoon )
Garam Masala ( 1 teaspoon ) – preferably home-made
Chicken Masala ( for taste, ready-made is fine)
Bread / Bun / Chapati ( as per your preference)
Preparation
1. Fine chop all veggies ( Onions, Tomatoes, Green chillies, Coriander leaves) and keep them aside.
2. Hard boil the eggs, remove shells and cut each egg into half to separate yolks and whites.
3. Chop both whites and yolks into small/medium pieces and keep them aside.
4. Heat a pan/kadhai, add oil and saute chopped onions, tomatoes and green chillies until onions start becoming brown.
5. Add turmeric powder, red chilly powder, garam masala, chicken masala, salt to the mixture. Stir fry well.
6. Add whites and stir fry for 3 minutes. Let the still mixture cook for 5 minutes.
7. Finally, add yolks, stir fry, mix well and let the mixture cook for 3 minutes.
8. Serve with chapati / bun / bread.
This post is recovered from damaged website. Work is in progress for this blogpost and below 3 specific blogposts:
http://shubhamaher.com/jamun-shots-recipe
http://shubhamaher.com/boiled-egg-bhurji-recipe
http://shubhamaher.com/trip-to-south-goa
It’s start of the June and the monsoon season is showing up here in Pune. I and my friends decided to go on a trek to Torna Fort ( also called as Prachandgad ) on 17th June, Saturday. We reached the foothill around 9 am and started hiking. Nowadays there is a cement road constructed […]
I love documentaries and watch them more than I watch movies. So, just two weeks before, I was watching a very old documentary on tribal life called as “Nomads of the Rainforest”.
While watching the documentary, what intrigued me the most in the life of a nomad was the tools and techniques these tribal men used, to hunt their food. Especially, the blowgun (also called blowpipe).
This simple yet powerful weapon seemed to be favourite amongst all tribal communities. After having seen how the nomads created this weapon using simple tools and basic equipment in the forest, I decided to search for an online tutorial which will instruct to create one and came across this very short and useful video:
This weekend, a friend of mine involuntarily reminded me of this DiY Project and I immediately decided to make one today.
Although, the above video is self-explanatory, I have summarized below, all the steps that I did to make the blowgun.
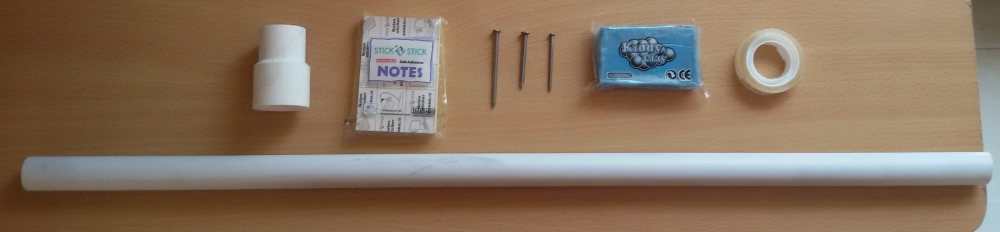
Things needed for Blowgun:
I already had a pack of sticky notes and a pair of scissors, so I went to a nearby hardware store and bought the following required things as seen in the above video:
Item
Price
2’ PVC Pipe with 0.5” diameter
30₹
0.5” to 0.75” PVC Pipe Female connector/adaptor
20₹
No. 12 x 1.5” long Wire Nails
All three types of nails, 10₹ in total.
No. 14 x 1.5” long Wire Nails
All three types of nails, 10₹ in total.
No. 14 x 2” long Wire Nails
All three types of nails, 10₹ in total.
Clay - 1 small pack
20₹
1 Cello tape
10₹
Total:
90₹
Making the Blowgun
As the blowgun comprises of only two things, we simply snug-fit the connector to the PVC pipe at one end.
Making the Darts
This is one of the important part of the whole blowgun kit.
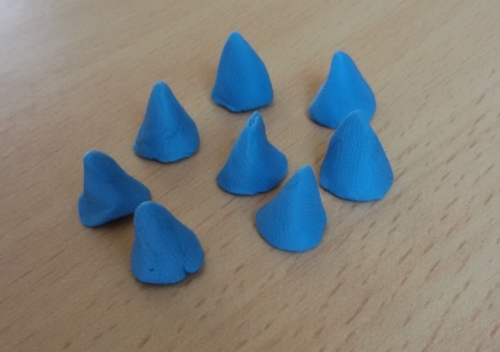
Using the clay pack, roughly mould small amount of clay into tiny cones as shown below and keep these aside:
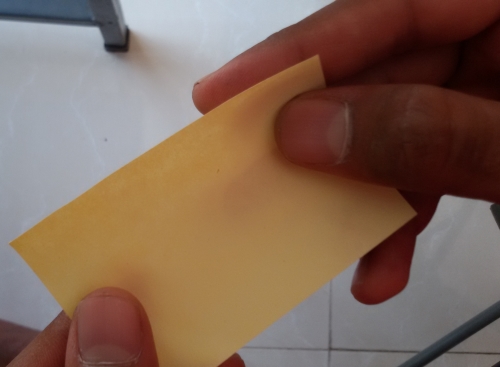
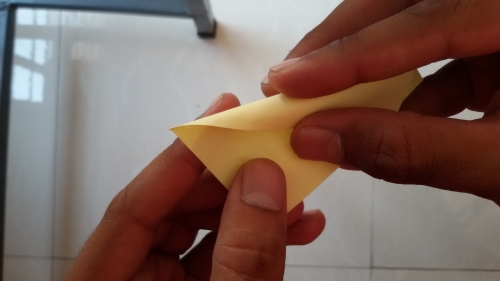
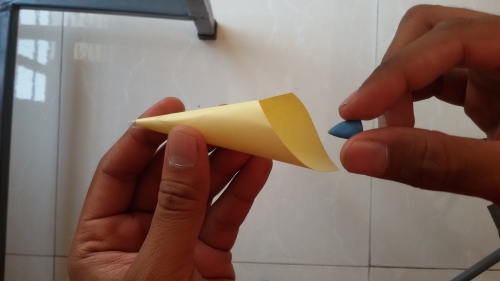
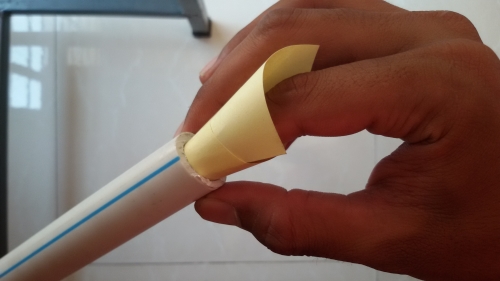
Take a sticky note, using one corner of it as apex of the cone, twist it as shown in picture# 2.a, 2.b and 2.c below:
Picture# 2.a
Picture# 2.b
Picture# 2.c
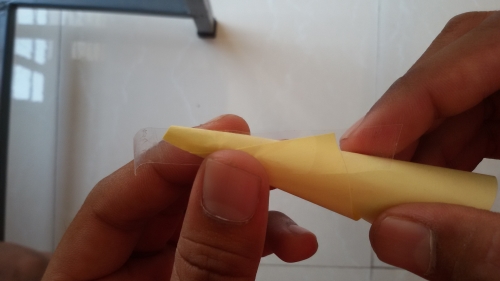
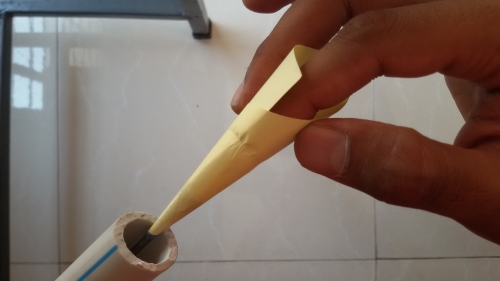
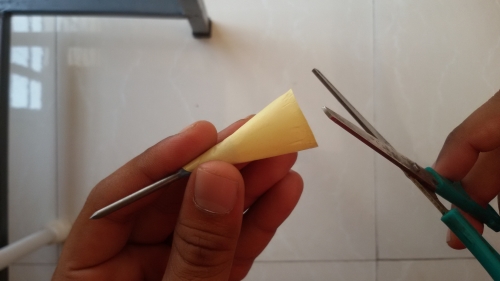
Tape the outer part of the sticky note such that it completes the cone(see picture# 3.a).
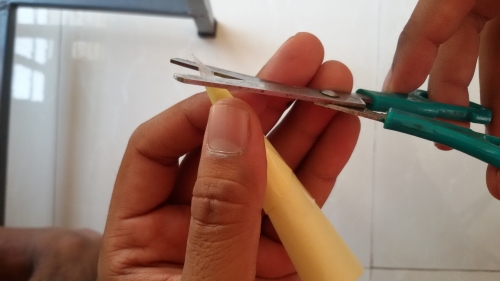
Cut off excess tape with a pair of scissors(see picture# 3.b).
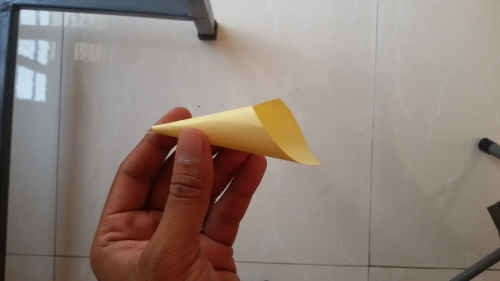
Now, picture# 3.c shows how an empty paper dart looks.
Picture# 3.a
Picture# 3.b
Picture# 3.c
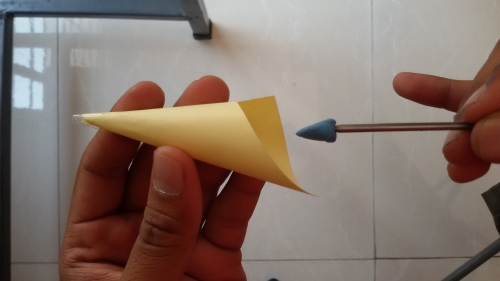
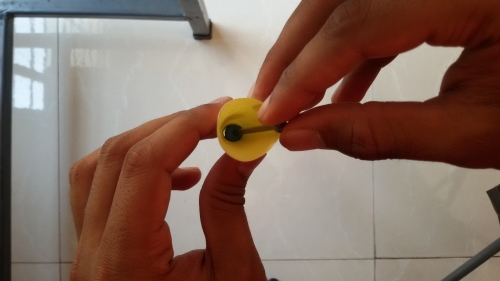
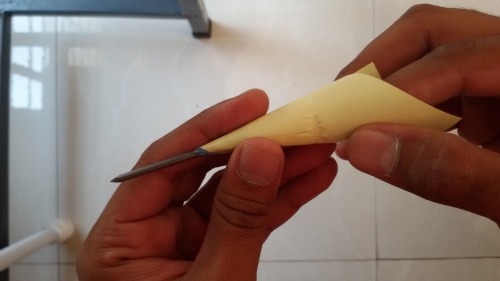
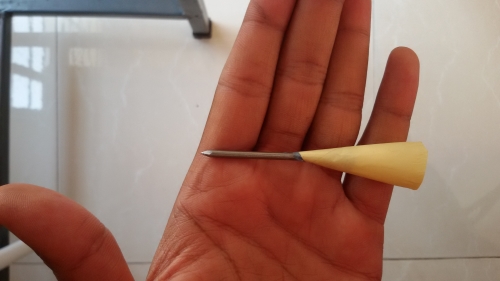
Take one clay cone that we created earlier, and pierce a nail into it such that we can push the pointed part of the cone into pointed part of the paper dart. Gently push the nail alongwith the clay cone so that it fits in properly. Then, pull out the nail from outside. [See below pictures: 4.a to 4.e]
Picture# 4.a
Picture# 4.b
Picture# 4.c
Picture# 4.d
Picture# 4.e
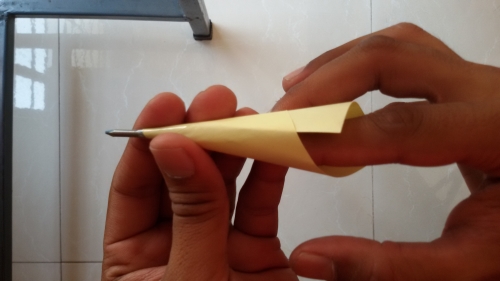
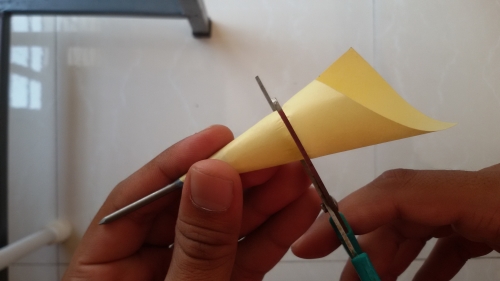
Now we take the dart from above step, and try to fit in the pipe so as to create a line using which we can cut off excess paper. [See below pictures: 5.a to 5.f]
Picture# 5.a
Picture# 5.b
Picture# 5.c
Picture# 5.d
Picture# 5.e
Picture# 5.f
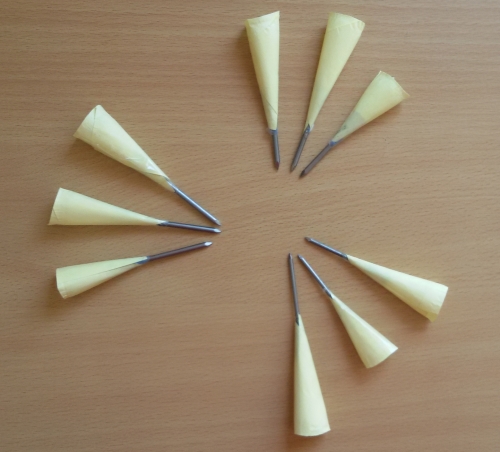
In similar way, I created paper darts with different types of nails. [See below picture]
Picture# 6.a
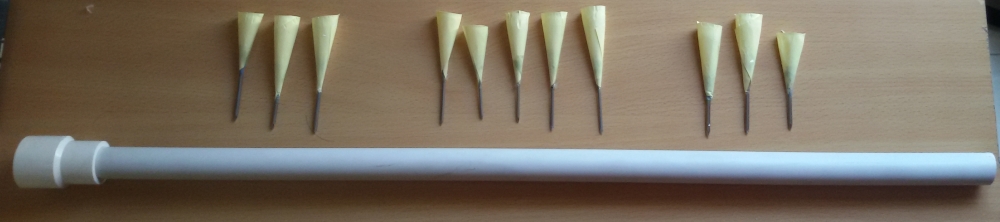
So the complete blowgun kit looks like this:
Picture# 7.a
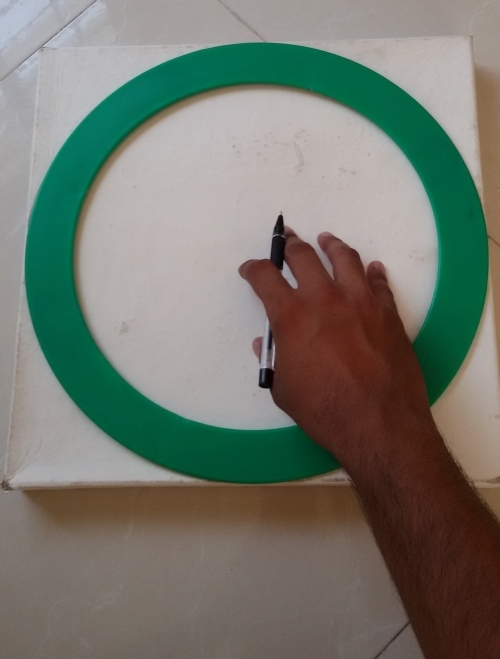
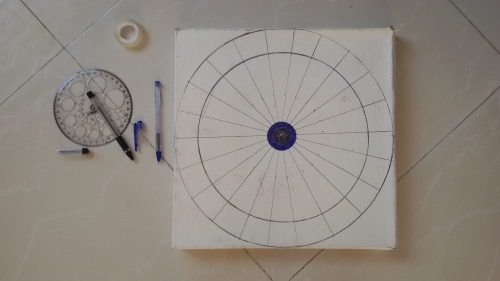
Making the Dartboard
I dont have a dartboard, so I decided to make one by reusing things at home.
Pulled out an unused box and using my juggling ring, a ruler, pens and protractor; drew borders on it. [See below pictures: 8.a and 8.b]
Picture# 8.a
Picture# 8.b
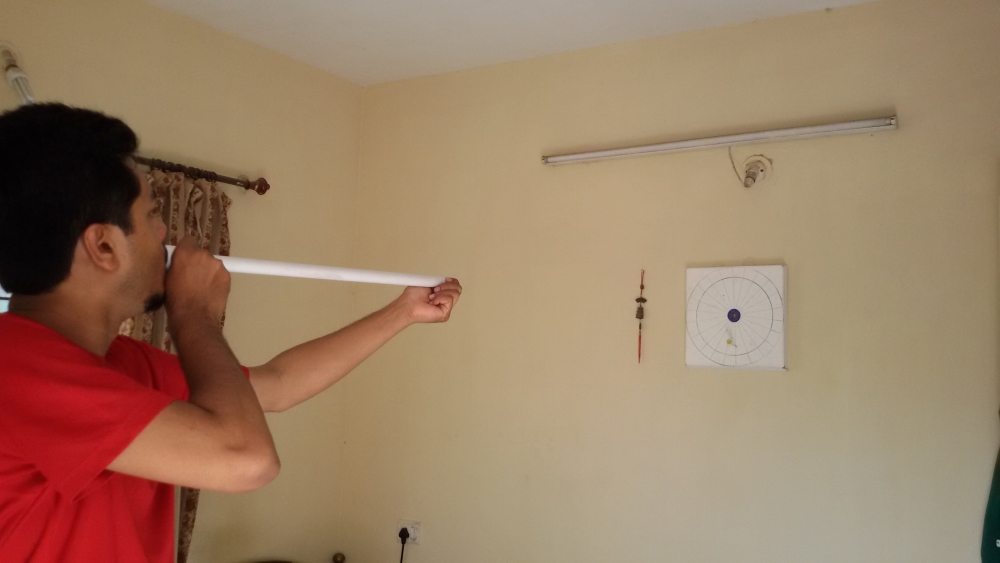
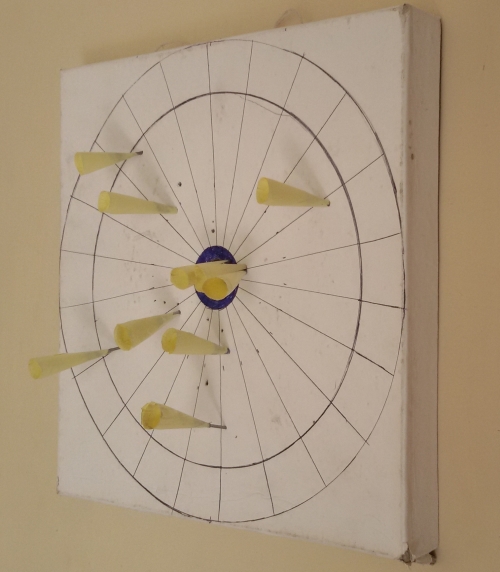
Testing the Blowgun kit
Now that the dartboard is ready, I decided to try the complete blowgun kit.
Mounted the dartboard on one of my wall in the bedroom and tried to shoot a couple of darts. It works perfect.
Picture# 9.a
Picture# 9.b
You can be creative and do other things to the blowgun like add laser, spray-paint the gun, adding a quiver, etc.
This was my first talk at null Meetup and I really enjoyed interacting with all the other inquisitive and like-minded security enthusiasts and professionals.
Alongwith the presentation, my talk required analyzing a couple of real-world Android malwares and demoing a few code snippets from these. So here are the download links for all the material:
null is India's largest open security community. Registered as a non-profit society in 2010, we have been active since even before that. null is about spreading information security awareness. All our activites such as null Monthly Meets, null Humla, null Bachaav, null Puliya, null Job Portal are for the cause of that.
null is Open, is professional, is inclusive, responsible and most importantly completely vounteer driven.
Any questions/comments/suggestions/criticisms, feel free to post.
Many smartphone users ( including me ), don't like the new ring lockscreen that we get after some software updates on older HTC Sense 2.1 devices ( like my phone, which is HTC Salsa C510e ).
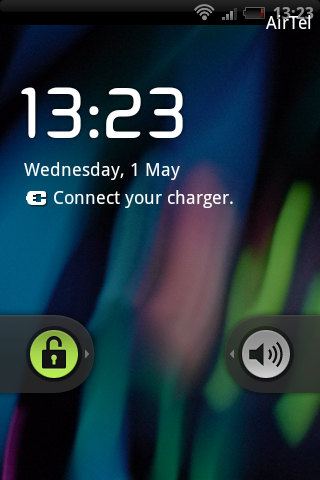
So here is a trick to change the ring lockscreen to a slide-to-side lockscreen as shown below:
Ring lockscreen changed to Slide-to-side lockscreen
Any file explorer with root access (my favourite is X-plore ! Its best for stuff like modding)
Steps:
1. Check HTC Sense version. By navigating to "Settings" ==> "About phone" ==> "Software information", check if it says "2.1" under "HTC Sense version". This is how it should look:
2. Using any of your favourite file explorer app, navigate to /system/app/ . There will be a file named "HtcLockScreen.apk" (see the red box) :
3. Rename it to "HtcLockScreen.apk.bak". We dont delete it because if the trick doesn't work or if we want the ring lockscreen back, we can rename it to original name.
4. After renaming:
5. Reboot the phone. You will have the slide-to-side lockscreen after the phone starts.
AXMLPrinter2.jar (for converting a binary XML into textual XML)
jd-gui
signapk.jar (for re-signing the modified APK)
Overview:
The general overview of steps required to carry for reversing a Native Android app are:
Steps:
DOWNLOAD
Step#1:
I have put together all the tools and the target crackmeAPK file in one directory called "mycracklab", zipped and uploaded it. Download the mycracklab.zip and extract it anywhere you like. I have the "mycracklab" directory at /home/shubhuntu/mycracklab/
TESTING the TARGET CRACKME
$ pwd
/home/shubhuntu/mycracklab

$ ls
crackme.native-1.apk  tools
Step#2:
Viewing files in the APK. An APK is a ZIP file with a .apk extension. So we use the "zipinfo" command.
As seen the crackme displays the message "Hello from JNI !". Our aim is to modify this message string. Let us begin our hunt for the message. Remember NOT to close the emulator ! DECOMPILATION (.dex to .jar to *.java files)
Step#6:
Extraction of all the files from the crackme APK(which is actually a ZIP file).
We come to know that the initialactivityis ".HelloJni" which corresponds to "HelloJni.java" source file and is in "com.example.hellojni" package. Open "HelloJni.java" in any of your favourite Java editor. Following is the code of "HelloJni.java":
Its quite evident that the static code block which gets executed first is loading a native library named "hello-jni". So its full name will be "libhello-jni.so" Step#10: Verifying the shared object file "libhello-jni.so"
Also you can observe from the "HelloJni.java" file, that the "setText()" method sets the text using the native method declared as:
public native String stringFromJNI();
DISASSEMBLING the LIBRARY FILE
Step#11: We will now look for this "stringFromJNI()" method in the disassembled view ofIDAinside the native file "libhello-jni.so". I am running the Windowsversion of IDA on Ubuntuusing Winebut you can build and use the Linuxversion if you want.
Step#13: ARM and THUMB SWITCH INSTRUCTIONS warning. Just click OK:
Step#14: This is the disassembled view of the "libhello-jni.so" file. Click on the "Exports" tab for viewing all functions exported by this library:
Step#15: Here is the list of all exports. The Java methods that are made native and implemented using this library are by default named in "Java_complete_package_name_ClassName_methodName" format. For e.g.: In our case, package name is "com.example.hellojni", class name is "HelloJni" and method name is "stringFromJNI" so the function name in exports will be "Java_com_example_hellojni_HelloJni_stringFromJNI".
Click on this function, and IDA will show you the ARM opcodes for this function:
Step#16: This is the disassembled view of the function. IDA is so powerful that it comments the code where strings are used. Thus as you can see that IDA has commentend our string (I have highlighted it with a red box below). Also we come to know that the string "Hello from JNI !" is declared as a variable named "aHelloFromJni".
Double-click on "aHelloFromJni" and it will show you the declaration of string.
Step#17: As you can see, "aHelloFromJni" is defined as "Hello from JNI !" with the DCBassembler directive.
Step#18: Now click on the "Hex View" tab, and you will see the Hex Dump for the defined string. Click on the first character of the string i.e. 'H', and at the status bar at the bottom you will get the file offsetof the beginning of the string literal.
Step#20: Replace the original string bytes with new bytes and save the file. I have replaced the original string "Hello from JNI !" with "Bye.. from JNI !" Warning#1: As it is a binaryELFshared object file, take care that you replace only the original bytes in the string "Hello from JNI !" starting from the offset 0x2030 till 0x203F. Warning#2: Also see that you "REPLACE" and not "INSERT".
Now as we have modified the "libhello-jni.so" file we need to update the modified file in the "crackme.native-1.apk" file and also resignthe "crackme.native-1.apk" !
Step#21: Updating the modified library file inside the .apkfile.
$ zip ../crackme.native-1.apk -u lib/armeabi/libhello-jni.so
updating: lib/armeabi/libhello-jni.so
 zip warning: Local Entry CRC does not match CD: lib/armeabi/libhello-jni.so
 (deflated 61%)
Merely installing the new crackme will give error as the fully qualified name of both the original and modified crackme will conflict because of being same (com.example.hellojni). So before installing our modified apk, we need to uninstall the previous one.
Step#23: Uninstall the previous crackmemanually by navigating to "Settings" ==> "Manage Applications".
In order to test our new modified apk, we need to go to "platform-tools" directory of the SDK:
$ cd /opt/android/adt-bundle-linux-x86/sdk/platform-tools/
P.S.: The emulator is still running.
Step#24:
Install modified APK(crackme.native-1-SIGNED.apk) in Emulator using adb.
EasyAPKDisassembler ( Its batch utility created by some XDA member that supports disassembling, converting binary XML to textual XML, APKtool assembly/disassembly, Signing/Designing Certificates, etc)
1. Copy the target APK file ( TestHelloWorld.apk ) to "platform-tools" folder inside the main "android-sdk" folder. For e.g. On my machine Android SDK is in "D:\Program Files(x86)\Android\android-sdk\platform-tools" 2. Copy the Command Prompt(cmd.exe) from your system files into "platform-tools" folder and double click it to type following commands:
D:\Program Files (x86)\Android\android-sdk\platform-tools>adb devices List of devices attached emulator-5554 device
7. Open "TestHelloWorld.apk" with WinRAR or any other archive tool that supports the ZIP format as .APK is nothing but a .ZIP file with a different extension. From this file extract the "classes.dex" into the same dir where you extracted the "EasyApkDisassembler.V1.3.1.zip" files :
8. Start "EasyApkDisassembler.EN.bat" , press option 2 and give the name of the file as "TestHelloWorld.apk" :
9. Now the "classes.dex" file is disassembled into the same folder with a name as "out_TestHelloWorld.apk". This folder contains all the disassembled source code in Dalvik Opcodes format (.smali) files :
10. Navigate to "\out_TestHelloWorld.apk\com\example\android\helloactivity\" :
11. You will see many .smali files. Open the "HelloActivity.smali" file in Notepad or any other text editor you like :
.class public Lcom/example/android/helloactivity/HelloActivity; .super Landroid/app/Activity; .source "HelloActivity.java"
# direct methods .method public constructor ()V .registers 1
12. You have successfully disassembled the .dex file into .smali file. In order to understand the .smali code you will need to go through the Dalvik Opcodes List.
13. The disassembled file in .smali format is very easy to patch. In my upcoming Android reversing tutorials I will be covering patching the Dalvik Bytecodes.
Steps for DECOMPILING (.dex to .java) :
1. Download latest copy of "dex2jar" tool and extract its content in the same folder where you extracted the "EasyApkDisassembler.V1.3.1.zip" files as in above part. Also copy the same "classes.dex" into "dex2jar-0.0.9.6" folder :
2. Within the "dex2jar-0.0.9.6" folder, open the command prompt and type following command :
dex2jar classes.dex
3. After the command completes you will see the "classes_dex2jar.jar" file in the same folder. You can extract this .jar file into a folder you like and you will see many .class files. Open the "HelloActivity.class" file in "jd-gui" or any other java decompiler you like :
4. You have successfully decompiled the .dex file into .java file.
1. Download the actual flash video tutorial from here.
2. Unzip Win32 RCE Tut1.zip anywhere you want and open the Win32 RCE Tut1.htm file in your favourite browser. Note: Your browser should support flash(.swf) files. If it doesn't then download the flash video plugin for your browser.
2. If we type "john" as password, it results in "ACESS DENIED" that means the password "john" is wrong.
3. Now open the class file in JavaBite by navigating to 'Classes | Add Java Class' in the menu. We will not use any java decompiler(like we did in previous tutorial) as we are going to study the class file at a more granular i.e. assembly(java opcode) level.
4. After opening the file you will see something like this:
5. In the left-hand side column, expand the tree by navigating from the class file to 'Methods | main'. After selecting 'main', the bytecodes of 'main()' method will be loaded in the right-hand side column. This is the opcode/assembly representation of the body of the 'main()' method. After loading, it should like this:
6. In the loaded bytecode, there are 3 columns:
'#' - The bytecode index (in hex).
'ByteCode' - The actual hex representation of the bytcode.
'Disassembled' - The disassembled representation of the java opcodes.
7. All the words like 'new', 'dup', 'getstatic', 'invokespecial', 'astore_1', 'ldc', 'invokevirtual', 'ifeq', 'goto', 'return' are infact the java opcodes. In order to understand them properly you should go through the 'Java Virtual Machine Instruction Set'.
8. As we have know from the previous tutorial that this crackme has 'shubham' as the password, we see the same string as being the argument to 'ldc' instruction at bytecode index '000B' in the loaded bytecode.(See below):
Short Explanation: The argument (number) '0005' is a reference to the string literal "shubham" in the constant pool of the loaded class file.
9. Traversing down in the loaded opcodes, we see a line of our interest the 'ifeq' check ! This is the appropriate line to patch as it is a validation check for the password.
Short Explanation: The eq succeeds if and only if value = 0. That means if the comparison with 0(false) succeeds then it branches to the address given in the argument. So in above e.g., if the condition is false then it jumps to bytecode index '0000002E' that is at line:
10. Next we see that the string "ACCESS DENIED :-(" is loaded. This confirms that the current line(bytecode index '0031') is the line inside the 'else' block of the 'if-else' statement.
11. So we now, actually patch the 'ifeq' line at bytecode index '0020' as shown below:
Select the line. Righclick and choose 'Edit instruction'.
12. Now the 'Edit Instruction' box will pop up. Select 'ifne' from the 'Instruction' dropdown list.
13. Also double click the 'BRANCH_OFFSET' item in the 'Parameters' tab and a 'Edit Branch Offset' box will pop up. Select '002E - getstatic' from the 'Branch to line' dropdown list of the 'Branch Offset' tab.(see below)
14. Thats it!
Conclusion:
We have changed the 'ifeq' conditional instruction to the 'ifne' conditional instruction i.e. we have inverted the conditional check. But why ? What we have done is that we have patched the crackme such that for every password input other than the original("shubham") the crackme will result in displaying the message "ACCESS GRANTED :-)" that means for any password(except original) the true case of if-else check is executed.
Notes:
If you have not understood this tutorial then you must be lacking the knowledge of Java opcodes. Please go thoroughly from the 'Java Virtual Machine Instruction Set'.
4. The string "shubham" is assigned to String variable 'str1' and the input password is taken in String variable 'str2'.
5. There is a simple if-else check to compare if 'str1' and 'str2' are equal that means the string "shubham" is a hardcoded password !!
6. So we have fished out the hardcoded password from the decompiled code of the class file. Lets try this fished password to check if it works:
Conclusion:
This tutorial covered how to fish out the password from a class file by using a decompiler. However such technique of using only decompilation is not feasible in complex(obfuscated) programs. In such a case you may need to use other techniques like patching the actual and appropriate bytecode in the class file by studying the check/validation process at a more granular level.
The purpose of this tutorial was to make you understand the use of decompiler in reverse engineering, understand the scope of finding hardcoded password.
However, in the 'Java Reverse Engineering Tutorial#3' , we will reverse engineer this very same crackme with a different approach - Java bytecode patching. This will clear the significance of using both the techniques.
Notes:
In case you are unable to run the given .class file crackme, you can compile for yourself the sourcefile(SimplePasswordCheck.java) for this tutorial.
Whats the size of Boolean Datatype in Java ? 1bit, 8bit, etc ? In this tutorial we will study the size of the most speculated datatype in Java: Boolean. The reason for this is that many people think that Boolean's size is 1 bit but thats not possible, so may be its the minimum possible 8bits. No. Its not either. Well, we will use reverse engineering to see actually what is the size actually assigned in the class file.
Tools Needed:
Any Sourcecode Editor with Java Syntax Highlighting ( I prefer Notepad++ )
3. A file named as "BooleanSize.class" is generated.
4. Open this file in jd-gui java decompiler. You will see the following output:
class BooleanSize
{
  public static void main(String[] paramArrayOfString)
  {
    int i = 1;
  }
}
Explanation:
So after decompiling the class filewe observe that, the boolean variable that we declared is actually an 'int'. Why ? Because, the actual size of a boolean type is not defined correctly by the Java Specification itself.
In the boolean section, it says:
The boolean data type has only two possible values: true and false. Use this data type for simple flags that track true/false conditions. This data type represents one bit of information, but its "size" isn't something that's precisely defined.
So why 'int' ? Actually, it is VM-dependent. I used a 32bit Java Compiler to compile and it assigns size of an 'int' to a 'boolean'.
Conclusion:
Hence, the size of boolean datatype in Java is VM-dependent and not a fixed size like 1bit or 1 byte.
 Picture# 2.a
 Picture# 2.b
 Picture# 2.c
 Picture# 3.a
 Picture# 3.b
 Picture# 3.c
 Picture# 4.a
 Picture# 4.b
 Picture# 4.c
 Picture# 4.d
 Picture# 4.e
 Picture# 5.a
 Picture# 5.b
 Picture# 5.c
 Picture# 5.d
 Picture# 5.e
 Picture# 5.f
 Picture# 6.a
 Picture# 7.a
 Picture# 8.a
 Picture# 8.b
 Picture# 9.a
 Picture# 9.b